Monday, April 27, 2009

Getting Started with Traditional Animation : Basic Techniques PART 1

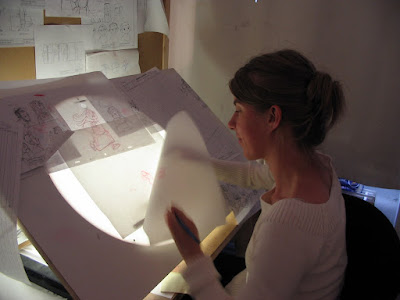
Whether you are using using traditional pencil on paper with an animation disc (recommended) or a Wacom tablet drawing directly into TVPaint Animation ,  the material posted below will help you to get up to speed on the terminology and techniques of traditional hand-drawn character animation.


See this   "Traditional Animation Materials List"   and also my blog where I have links to many sources for traditional animation equipment and supplies:

Animation Studio Stuff for Students : Hand Drawn Animation Equipment

PLEASE let me know if any of the embedded movies or images posted below are not showing up for you .

Traditional Animation Basics - Starting off right - 

Whether your are using traditional pencil on paper or using a Wacom tablet to animate you will want to make sure that you have understood and follow the traditional animation methods and terminology.

To make sure we are all "on the same page" please spend some time to delve into our class Textbooks and read these sections prior to the first week of class or at the very start of the first week of class for Module 1 and continue to refer back to this material so you will be able to establish good industry-standard work habits from the start.

To get started , read in our class textbook , "The Animator's Survival Kit" by Richard Williams , pg. 41 - 45 on  ANIMATION IS CONCENTRATION .

Notice there in the book he relates and illustrates an amusing anecdote of an encounter he had early in his career with master Disney animator Milt Kahl , resulting in him coming to understand that "Animation is Concentration" . You can watch Richard Williams amusingly tell the story here:


But within this amusing story is a solid truth :  Animation is Concentration.   Don't let yourself get distracted when you're animating.   Animating involves a lot to keep track of mentally and if even the great Milt Kahl admitted that he "wasn't smart enough to think of more than one thing at a time"  then maybe we aren't either ? 


REQUIRED READING - 

(you can wait until first week of class to do these readings , or get a jump on things and read them now , before the semester starts.  We'll be reviewing these readings again)

    1.) Character Animation Crash Course by Eric Goldberg  , read the preface pages  pg. xvii – xxii on “Definition of Terms” ,

     2.) Character Animation Crash Course , read pg. 67 – 74  on The Exposure Sheet. (aka the "X-sheet"  or the "Dope sheet" .)

    3.) Also read pg. 70 – 77 in the Richard Williams book  The Animator’s Survival Kit where he discusses the development and use of The X-Sheet.  Some of the material overlaps with what Eric Goldberg writes on the X-sheet , but it is good to get multiple points of view to better understand essential points.

    Even if you are animating paperlessly with a Wacom tablet in TVPaint or some other digital 2D program you will find that using a traditional X-sheet is very useful and gives you more control over your timing.   This is not just “old-timey” stuff being reviewed here with a sense of nostalgia for the good ol' days of Walt and the Nine Old Men , etc. ; it’s a logical system that has been fine tuned over many years of use in professional animation studios and it still works best for traditional character animation , even with all our digital bag of tricks.

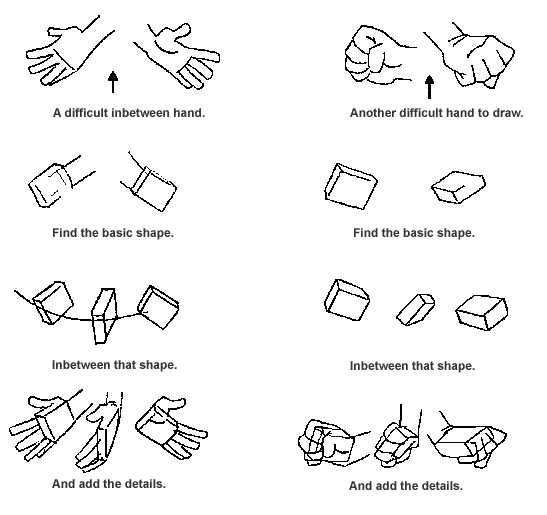
      4.) Read  The Animator’s Survival Kit by Richard Williams,  pg. 36 – 39 on Timing and Spacing ,  and read  pg. 46 – 67  on Charts & Inbetweens,  Keys, Breakdowns, Inbetweens, On 3 Ways to  Animate.

----------

    5.)  OPTIONAL READING In Animation: From Pencils to Pixels by Tony White, read Chapter 11  -  “2D Animation Basics” , pg. 332 – 348 on Keys , Inbetweens, and Timing , so you will better understand the concepts of Key drawings, Inbetween drawings, and Timing/Spacing charts. 

    Another OPTIONAL READING would be to read in Chapter 11 of  Animation: From Pencils to Pixels by Tony White,  from pg. 349 –to - 365  to further familiarize yourself with the use of the Exposure Sheet (aka “the X-sheet” or “the Dope sheet”) and the use of peg bars and flipping.

    Again, you'll notice some overlap of the material you're also reading in the Eric Goldberg and Richard Williams books , but we tend to learn through repetition and I hope the point is not lost on you that all three of these authors writing at different times and different places share a common "language" of traditional animation terms and methodology.
Flipping and Rolling Your Drawings -

An important technique to learn is how to "roll" your drawings on the pegs of the animation disc or light box and also how to flip your drawings to check the action, so if you are using  traditional pencil on paper for doing your assignments in this class then you should be aware of how to properly Roll and Flip your paper drawings.

 Although difficult to describe, both rolling and flipping are a knack you will acquire as you do them more. Sometimes both of these actions are just known simply as Flipping, depending on who you ask. See "The Animator's Survival Kit" page 80 - 83.

You can use the rolling action to check a group of five drawings stacked on top of each other (one sheet flat on the drawing surface and the other four sheets of paper held between the fingers.) The wrist and fingers work together to roll the drawings back and forth like this so you can preview the action , see the animation on the drawing board:


TIP: a rubber band stretched over the pegs helps keep the drawings from falling off the pegs while you roll them.

In this brief movie taken at the Disney Studio  animator Frank Thomas is seen demonstrating both rolling (on the pegs) and flipping (off the pegs) as he animates and checks his work on Lady and The Tramp :


Here is footage of animator Fred Moore at the Disney Studio working on his light table , drawing Mickey Mouse:


 This video also shows the basic wrist/fingers action for rolling the drawings on a pegbar:


Here are a few more videos showing you how traditional animators work with the drawings on their animation disc, rolling the drawings on the pegs, and also "flipping" the drawings off the pegs to check the action. You should get used to doing this with your own drawings.  Please watch these in their entirety .

First, animator Joanna Quinn shares how she works:


(More videos of Joanna Quinn:   https://www.youtube.com/playlist?list=PLpyXxVvCbmX91rDs2gWgTI5uf-bp_6J0-&feature=view_all 

Animator Sylvain Chomet discusses his approach to animation:


Rough To Clean : We Work in Stages -

Did you notice how both Joanna Quinn and Sylvain Chomet work rough in their animation drawings ?   Sometimes beginning animators have a tendency to try to work too clean ,  trying to make their animation drawings very precise and "tight" in terms of the line quality, but this usually ends up making the animation look very stiff .

Below is a great example of how a master animator  works  --- this scene of Jane from Disney's "Tarzan" movie is by Ken Duncan .   Ken's final  "roughs"  that he turns over to his assistants for inbetweening and clean-up are very meticulously drawn, so no doubt is left about what he intended ,  but if you look at Ken's initial rough pass you see that he works VERY ROUGH at first.

Doing a rough pass allows him to concentrate all his energy on the acting.   Once he gets the rough pass established he goes through and does a tie-down pass to clarify the drawings and add details.

The first clip shows Ken's first rough pass.   The second clip shows his tied-down rough pass  (which in turn will be given to an assistant animator who will put down a final, ready-for-scanning clean line )

But to get to that second set of tied-down , detailed drawings the path he takes is to do the rough pass first.   This is a method which allows the maximum flexibility in developing the scene. 

Ken Duncan’s first rough pass:


Ken's Second Rough Pass , a "tie-down" pass -


How the Final Animation appeared in Color -


 For more examples of animator's Pencil Tests go to :

 http://livlily.blogspot.com/2010/11/pencil-tests-animators.html

http://www.penciltestdepot.com/

Numbering and Charting Drawings :  Keeping Track of it All -

As you've gone through the readings on traditional animation terminology and methods discussed above , please make sure you have a good grasp of the logic used in numbering the drawings on the actual artwork as well as on the X-sheet , and how the Charts are used to indicate timing and spacing on the drawings.

Each of the recommended text books for this class each one has a section on the use of the Exposure Sheet,  or X-sheet for short.

The best explanations of this important tool are in Eric Goldberg's "Character Animation Crash Course"  pg. 67 – 74  on The Exposure Sheet  and Richard Williams's "The Animator's Survival Kit" , pages 70 - 77 .

I'd like you all to make sure you thoroughly understand what is covered in those sections regarding numbering of drawings whether you are using TVPaint Animation or animating traditionally on paper.

Notice this numbering system was developed primarily at Disney and is the most flexible system:

When animating "On Twos" (each drawing exposed for two frames) the drawings are numbered by odd numbers , while animation "On Ones"  is numbered with both the even and odd numbers consecutively . 

Thus a section of animation On Twos is numbered like this :

 1, 3, 5, 7, 9, 11, 13, 15, 17, 19, 21  , etc.

because each drawing is exposed for two frames on the X-sheet or timeline .

Drawing #1 is exposed on both frames 1 and 2 ,  drawing #3 is exposed for frames 3 and 4,  drawing #5 is exposed for frames 5 and 6, and so forth.   The drawing number corresponds to the frame number it starts on .  The frame numbers always advance forward at 24fps ("on ones")  but in most cases our animation can be effectively done on "12 fps" , (that is exposed "on twos") .

Now , let's say that in looking at the pencil test of this scene animated On Twos you decide that part of the action would look better On Ones , so you can easily drop-in the drawings on ones (on even numbers) if you inbetween the odd numbered drawings to add drawings on ones:

  1 ,2 ,3 ,4, 5, 6, 7, 8, 9, 10, 11, 12, 13 ,

and then go back to twos :  ,15, 17 19, 21, 23, 25, 27 , etc.

A good rule of thumb is that VERY FAST action will almost always be animated On Ones , whereas normal actions or especially slow actions can be On Twos.   But it depends on the action.  Test it first , try it on twos , then if you need to you can add ones.  Animating on Twos can save a lot of time and work since working on Twos is half-the-drawings needed as animating on Ones.

Example of Animation drawings with charts and exposure on X-sheet.


This system of numbering and exposing the drawings is very logical, elegant system. Read the Richard Williams book , "The Animator's Survival Kit"pages 70 - 77, especially page 76 and in Eric Goldberg's "Character Animation Crash Course"  pg. 67 – 74  on The Exposure Sheet to wrap your mind around this system of numbering and use it .

Also make sure you understand the concept and use of Charts on the drawings.  These charts indicate the animator's intended spacing of the inbetween drawings .   In the Richard Williams book "The Animator's Survival Kit" you can see an explanation of the form and function of the timing chart on pages 47 - 57 .  Charts are guides for how far apart the breakdowns and inbetweens are between the animator's Extreme drawings.    Even though you will be inbetweening your own work in this class , get in the habit of making clear, easily-followed charts on your animation drawings.

Here are some of the most common Charts you will see on animation drawings:

*IMPORTANT: Do me a favor. When you animate your assignments for this class make sure you number your drawings clearly near the upper right corner of the page and have your timing charts written clearly in that general area too, so that when you shoot or scan your drawings I can clearly see your numbering and how you have charted your drawings.

Also, scan and upload your numbered X-sheet (as a .jpg file) when you upload your movie file .

This will help me to give you accurate frame-by-frame feedback on any corrections you need to make with your timing and we will both be clear on which drawings I'm referring to in my Notes to you. Please do this whether you are animating on paper or paperlessly in TVPaint .

 It's important that I see your thinking process with numbering and charting your drawings -- 


Don't worry that the numbers flashing by up at the corner of the screen looks "messy". Everyone who works in animation is used to seeing those in rough animation tests.

Look at these examples from professional animators demo reels: 


Pablo Navarro Demo Reel 2010 from Pablo Navarro on Vimeo.

Animation of Owl from "Winnie the Pooh" by Dale Baer -


Dale Baer: Owl from Winnie the Pooh from Jamaal Bradley on Vimeo.

See the drawing numbers and the charts flashing by on the edges of the paper of the pencil test ? If you clearly mark your drawings like this then I will always be able to step through your pencil tests frame-by-frame and refer to the exact drawing or section of drawings that need to be tweaked.
....

"Cel" Levels and X-sheets in the Digital Age:
Every layer or level on the X-sheet accounts for each and every element in a scene : characters, props, effects animation (shadows, fire, smoke, etc.) , and Background elements.

Even though in the present day we are not physically photographing the levels on cels with a motion picture camera (instead we use a digital "camera" to composite levels within TVPaint , Digicel Flipbook, Toonboom, Flash etc.) you should still get used to thinking of the logical "stacking order" for the various levels.

Imagine you are looking down through the levels drawn on transparent cels , stacked on top of a BG level , with the camera pointing down . The top most level would be for any overlays, effects animation, or any character or prop that is in the foreground or covers another character at some point. Then come the character levels , finally the Background level on the lowermost level. The digital compositing process still needs to have the levels stacked in a logical manner like this, so consider that when planning your scenes if you have multiple levels in a scene.


Today this is all done in the computer , but the concept of LAYERS and the logic of LAYER ORDERING is the same .

Click the link to go to Part 2 of this post on "Getting Started with Traditional Animation" ,  ON INBETWEENING: A FOUNDATIONAL SKILL.


.

PART 2 : Getting Started with Traditional Animation -- ON INBETWEENING: A FOUNDATIONAL SKILL

PART 2 : Getting Started with Traditional Animation -- ON INBETWEENING: A FOUNDATIONAL SKILL 

If you have the book by Tony White "Animation From Pencils to Pixels"  read his material on  "2D Animation Basics"pg. 342 - 348 on Inbetweening:


Also take a look at the following videos which demonstrate the inbeween process.

This first video was done by one of the other instructors here at AAU, Tony Claar, where Tony explains very clearly an old inbetweening "trick" to accurately line up inbetween positions. (you'll see the same thing illustrated in Tony White's book Animation From Pencils to Pixels on pg. 342 - 348 ) This "dot method" as Tony calls it , is related to the "off-pegs-shift-and-trace" trick that we'll discuss more about later.   


Also review the attached handouts (click the links to download):   "10 Steps to a Perfect Inbetween"  and  "Clean Up Hints" , both of which discuss a little bit about tricks like "off-the-pegs" inbetweening which can increase your speed and accuracy when inbetweening.


In this video clip from a documentary on his career in the mid-1970's  Richard Williams tells the truth about what full-animation inbetweening is about : "Every Drawing is Important " -

(the part about inbetweening starts at the 0:45 mark after the clip from Williams's "A Christmas Carol" )


What he says is true:  "Inbetweening" as a separate step in the process is often times a necessity of mass production pipelines, but in fact anyone who is doing "inbetweens" or "breakdowns" or is a "Key Assistant Clean Up Artist" is doing animation .   Traditional full-animation takes every drawing seriously. (yes, as Dick Williams points out , there are times when there are just straight half-way drawing-between-drawing inbetweens that need to be done to complete the production , but even then you can keep up a high level of craftsmanship.)
*The clip is a bit dated in terms of how Williams refers to what was then possible with computer graphics (c. 1978) , but his essential point still stands:  in classical hand-drawn animation every drawing is important and even "mere inbetweens" should be approached with the sensitivity and skill that only a trained artist can bring to the table. 
 In traditional inbetweening we build up detail on top after the basic shape has been lightly sketched in and established (usually with light blue or red pencil).

Here's an example of building up a character from rough, basic shapes before refining the final lines of the inbetween .  The main breakdown inbeween to do here is #5 .  Notice how the inbetween is built up by blocking in basic forms first, then tying-down the line detail on top of the basic forms.

Extremes are drawings #1  and  #8 .   1/2 -way breakdown inbetween will be #5 :


Maybe you'd like to try your hand at doing this test ?  Here are the drawings:

https://dl.dropboxusercontent.com/u/12911367/Inbetween%20Tests.zip

You'll need to print-out and peg up the drawings in registration .  (use the + cross-hair registration marks on the drawings).You'll need to print-out and peg up the drawings in registration .  (use the + cross-hair registration marks on the drawings as a guide to pegging-up the drawing on animation paper or on "peg strips" . )

When you get a tricky drawing , you need to first find the Basic Form on a difficult inbetween position,  then add the details after you have the basic form turning correctly:


----------------

A Note about working Paperlessly in TVPaint :

You can certainly use the "dot and arcs method" when working paperlessly with a Wacom tablet in TVP Animation , though it is more difficult to simulate taking the drawings off-pegs and shifting them when you're working paperlessly.  (you are encouraged to work traditionally with paper)

NOTE: Starting with TVPaint 9.5  and  continuing in TVPaint 10/10.5  and TVPaint 11 there is an "Inbetween Out-of-Pegs" ("off pegs") function.  This simulates the traditional "off-pegs" technique.

If you're using the older versions of  TVPaint 9.5 or 10/10.5 be sure you have 'Checked for Updates'  in the TVP Help menu so you have the most recent version.  (for TVP 9/9.5 the most recent version is 9.5.21 .  For TVP 10/10.5 the most recent version is 10.5.7 .   For TVPaint 11 the most recent version as of July 21, 2015 is  11.0.2 , but expect frequent updates , so make it a regular practice to "Check for Updates" under the Help menu and check the TVPaint Users Forum for announcements about updates. )

See the online documentation for TVPaint 11:   "Using the Light Table"   and   "The Out-of-Pegs feature".

See this tutorial I made on inbetweening in TVPaint -

** Inbetweening in TVPaint ** 

Another thing to remember if you're working paperless is that you can get greater accuracy in your inbetweens by zooming-in close on the drawings and working at a larger size. The larger the drawing , the greater control you'll have over your individual strokes. Sometimes when working paperless the best way is to rough your drawing very lightly with basic forms , then zoom in and start to refine the placement of the lines (with the onionskin/light table turned on) as you are zoomed in closer.  Periodically zoom out and scrub through the drawings to check how the lines are flowing.   If you detect any shakiness or jittering in some lines erase and refine the line. 

*Learning to animate on a Wacom tablet (Intuos or Cintiq) can be a challenge in and of itself  (to get comfortable with drawing on the tablet) , so as a general rule most people learn the process better by working traditionally with pencil and paper.  Then those traditional inbetweening skills can be applied to working on a tablet.

-------

Here is a playlist of videos I've found on YouTube that cover the topic of inbetweening.  Some of the so-called "tutorials" posted on YouTube are pretty bad,  basically "the blind leading the blind" , made by people who can barely draw or animate ,  but these tutorials on inbetweening presented in this Playlist are ones that I'd recommend you watch .   The ele tutorial on "Animation Clean-up" is more of a "digital inking" tutorial , since it doesn't really cover cleaning-up sequential animation drawings  (dealing with issues of maintaining consistency of volume and line weight from drawing to drawing) , but it's a good tutorial on how to approach cleaning-up a rough drawing .

https://youtu.be/86tqKH3zxuM?list=PLpyXxVvCbmX8LAj6PTnQpA5mNwfwV17Zb


In this video , veteran Disney animator James Lopez demonstrates how to block-in an inbetween drawing while constantly flipping between two key extreme drawings.   James writes:

“ This is a time-lapse video of me creating an "in-between" animation drawing between two "key poses" of animation in about 10 minutes.  I flip constantly to check and see that the lines are moving correctly.”

 https://www.youtube.com/watch?v=DxoNwcI8A2c

------

I would say "flip constantly" is the key phrase here . Students should keep in mind as they are watching this that even if they are working paperlessly with a tablet in an app like TVPaint or Toonboom , they must come up with a viable way to program the "scrub forward /scrub backward" keyboard shortcuts to their Wacom tablet express keys , or use a USB controller like a Griffin Powermate (or even an old game controller) rigged to "flip" back-and-forth between the drawings on the timeline , to simulate traditional flipping/rolling of paper on an animation disc.

 -------

This video by former Disney animator Dave Zaboski is a good introduction to animating and inbetweening in TVPaint. Dave uses a hybrid process of starting his rough drawings on paper , then finishing his scene in TVPaint :


TV Paint Beginner's tutorial from Dave Zaboski on Vimeo.


Here's another really great tutorial on the basics of animating with TVPaint , by Aaron Blaise:

https://www.youtube.com/watch?v=t_B8lB3Gf_w


I'd suggest you watch these video tutorials on  in FULL SCREEN mode so you can see the details .
.

Thursday, April 2, 2009

Two useful apps for Traditional Animation

For scanning animation drawings for import into animation apps such as TVPaint Animation or ToonBoom Animate Pro / Harmony,  or Digicel Flipbook  you should seriously consider VueScan scanning software.    VueScan (for Mac, Windows, and Linux)  offers many options for image adjustment/enhancement .  Scan your drawings in VueScan, then import to TVPaint  (or ToonBoom,  or Digicel Flipbook.

If your are using video capture instead of scanning then get iGlasses for Mac (Mac only, not available for Windows) .   iGlasses gives you many more options for manually adjusting the exposure, focus,  and white balance  using an HD webcam (such as the Logitech C-930) .  One more I should mention is a program called Webcam Settings , which is similar to iGlasses, for manually adjusting the image quality of webcams .  (again, this is a Mac-only program.  There are similar types of programs for Windows, but I'm on a Mac, so I don't have any recommendations. )


Pencil Testing with your iPhone or Android Smartphone - an alternative to scanning

A faster alternative to scanning is to capture your animation drawings with your iPhone or Android Smartphone. Modern phone cameras are quite high resolution , so the images captured can be very sharp. (the iPhone 7 has a 12MP camera for example , and similar Android phones have 12 MP or 8 MP cameras).   Use good lighting for optimum image quality.   See the document:

Image Capture Techniques for Hand Drawn Animation

(this is a booklet I put together several years ago, so the capture technology shown is dated  -- mini-dv cameras , video surveillance ccd cameras  -- but the camera stands and lighting set-ups shown are still valid if you're using an iPhone , digital camera, or webcam for capturing your drawings)


The best lighting arrangement is use 2 - to - 4 lamps arranged as shown in the diagram above , at about at 45-degree angle from the surface of the drawings. You want to adjust the lighting so you get totally flat, even illumination over the surface of the drawings, without any hotspots or shadow areas. Some plain white paper or translucent vellum (tracing paper) taped over the mouth of the lamps will provide diffusion of the light , so the light is evenly spread over the surface.


(this shows a video camera on a copy stand, but with an adapter this could also be a smartphone mounted on the copy stand, pointing straight down at the drawings  ... you can also use an HD Webcam such as the Logitech C-930 or C-920 to make your image captures directly into TVPaint using the Video Input panel,  but the iPhone camera can make captures that are as good or better than captures made with a webcam.)

See this  blog post by Jim Richardson on his blog Animateducate ,  which covers the topic thoroughly:

  https://animateducated.blogspot.com/2014/01/animation-on-your-phone-part-2.html 


For line drawings , set the iPhone camera to Monochrome (B & W) mode.  Adjust the exposure and then lock the exposure if possible and set the focus manually, then lock it.    Again, it is important that you use good lighting to provide even, flat illumination .  You'll need to get a REMOTE CONTROL for the phone so you can fire off the shutter without physically touching the phone. (to avoid the jarring the camera).  There are many different models available. Here are a couple you could use:

 https://www.amazon.com/CamKix-Bluetooth-Shutter-Control-Smartphones/dp/B00PJSIIES/

 https://www.amazon.com/Fintie-Bluetooth-Wireless-Multimedia-Smartphones/dp/B00WFXWKY4

 You'll also need to securely mount the iPhone/iPad or Android phone/tablet on a tripod or a copy stand with a tripod mount adapter . There are various models of tripod mounts you can use, such as this one:

https://www.amazon.com/Joby-JM1-01WW-GripTight-Mount-Black/dp/B009GHYLKS

  (check on Amazon for others : https://www.amazon.com/s/ref=nb_sb_noss_2?url=search-alias%3Dmobile&field-keywords=tripod+mount+ ) .

Or this:

 http://www.modahaus.com/shop/rostrum-camera-stand/

Each drawing is placed onto a taped-down ACME pegbar and illuminated by two lights at 45% angles on either side of the stand.  Use the ultra-thin metal peg bar so it sits flush with the shooting surface .


(don't be tempted to use the cheaper white plastic peg bars, because those are 1/8" thick and will tend to make the paper buckle , instead of laying completely flat when you put it down on the peg bar.   If you have one of these 1/8" thick white plastic peg bars and can't afford to buy one of the thin metal peg bars , see further down below on how to adapt it so it will sit flush [flat] with the shooting surface) .
The iPhone's (or Android' phone's)  camera must be adjusted to make sure the focus and exposure are locked before shooting so you don't get fluctuations in the focus or exposure , which will cause flickering.  Use the remote control to capture each image, so you don't physically touch the camera when capturing.

After you have captured all the drawings, transfer the image sequence from your phone to a folder on your computer (name the folder(s) by Scene Number , so you can keep track of your original image captures )  and then import the image sequence into your animation program such as TVPaint Animation or AfterEffects or what have you ,  to arrange the drawings in layers and to time the drawings on the timeline.

Scanning will still give you the very best image quality if you are scanning final clean-up drawings for coloring , but for pencil testing purposes it is much faster to capture your drawings with your iPhone or Android phone camera  (or you can use a digital still camera mounted on a tripod or copy stand ... follow the same procedure , capturing each drawing one at a time , using a remote control shutter release , and after the entire image sequence is captured, transfer the image sequence to your computer and then import the image sequence into TVPaint or whatever animation program you are using.

-----

A useful accessory is a hinged glass platen , to press down your drawings absolutely flat .
Plans to make one are here :

http://www.animatormag.com/archive/issue-16/issue-16-page-25/


Although a simple hinge made from gaffer's tape/duct tape will work fine . Or the platen can be free-floating sheet of glass that you place on and lift off each time you make a frame capture.  In that case super-glue or tape a drawer handle to the right and left side edges of the glass to make it easy to place on and off the shooting platform to press the drawings down flat.  Make sure the sheet of glass is wide enough that the handles will get outside of the shooting area, so you don't capture the edges of the glass or the handles on your frame captures.  For example , let's say you are shooting 12 Field animation paper , which is 12.5" wide x 10.5" high . Your platen would need to be something like
16" wide x 12" high so you have enough safe area round the edges that you won't capture the edges of the glass .
-----------

Using a white plastic peg bar  -


Many students purchase one of these inexpensive white plastic peg bars .  The advantage is they are inexpensive , but the disadvantage is that the white plastic peg bar is 1/8" thick and will tend to make the lower edges of the  paper buckle ,  instead of letting the drawing lay completely flat when you put it down on the peg bar.  You want to try to have the paper lay as flat as possible when capturing the drawings.

Here is how to make a shooting surface that allows the 1/8" thick white plastic peg bar to sit flush with the surface .  You'll need some 1/8" thick chipboard or matte board or 1/8" thick birch plywood (although the plywood is more expensive)


Use glue or double-sided tape to keep the peg bar from coming lose from the slot.

Tape down or clamp down the shooting platform to a table top under your tripod/copy stand/downshooter arm so it doesn't shift around under the camera when you are putting the drawings on and off the pegs.


A new Animation Pencil Test capture station: SIMPLICITY CAM 5e HD DOCUMENT SCANNER

UPDATE: 

The version of the Recordex Simplicity Cam referred to in the post below (model 5e) is no longer available , but they have similar models available.   Recently in working with this camera again I found some ways to improve the overall image capture quality , so I'll share the process in this document:

Improving Image Capture Quality with Recordex Simplicity Cam 

The main thing is to use Recordex's proprietary software XSightHD to capture the images , then import the captured images into TVPaint or whatever animation application you may be using.

-------------
Original post from a few years ago: 

As seen on the TVPaint Community User Forum :

This relatively new image capture station , the Simplicity Cam 5e HD Document Scanner by Recordex-USA  --


This unit is compatible with both Windows and Mac OS .

Capture resolution up to 2560 x 1944 (which is actually higher than 2K Film res. of 2048 x 1556). However, to get this resolution your computer's screen resolution needs to be increased to maximum.   If your computer screen resolution is lower you may not get this max. resolution.

Manual control of White Balance and Exposure. (NOTE: not anymore with the most recent update of the XSightHD software .  Unfortunately they removed manual White Balance and Manual Exposure as an option.   Hopefully they'll add it back in a future update of the XSightHD software. )

Max. capture  area of   12.75" x 17.25"  (so this will capture the usable drawing area on 12 Field [12"w x 9"h ]  and 16 Field  [16" w x 12.75" h]  animation paper.)   

Image capture is much faster than scanning on a Flatbed scanner .  (Image quality is better with scanner, but the image quality from the Simplicity Cam is good enough resolution for a pencil test)
NOTE: the base of the unit will need to be bolted down to a table top or a board so it can't be knocked over or jarred out of position (the base is weighted, but it needs to be completely locked down for animation) .

See this document :  Lock-down_Simplicity_Cam 

Add a thin tape down peg bar to the shooting stage to hold your drawings in registration as they are captured, 


 OR  if you have TVPaint Animation you can use the Peg Holes Registration FX in TVPaint to register the drawings post-capture , so you could potentially capture your images much faster by laying the drawings down flat on the shooting stage under the camera without a peg bar , but because the black backing of the shooting stage will show through the peg holes that will cause the peg hole shapes to be captured , so then when the images have all been captured into TVPaint you can run the Peg Holes Registration FX on the captured images to automatically align all the drawings in perfect registration  (Some other  pencil test softwares have similar types of automatic peg-hole shape alignment . Check with the Support Dept. of the software you use to see if this is an option .   I can tell you that the Peg Hole Registration in TVPaint Animation is easy to use and is very accurate.)
You will need to add a set of lights as the built-in LED light that comes with it is not generally bright enough .   But the lights you need for Pencil Testing are inexpensive clamp-on "shop lamps"  which you can purchase at any hardware store.   Use 150 watt equivalent spiral "Cool Bulb" fluorescent lights , which remain cool enough to tape a piece of  plain white paper over the lamps so you will get very bright, but diffused light spread over the shooting area so your drawings are captured without hotspots in the middle or shadows at the edges which can happen when pencil testing without adequate lighting.

This kind of lighting set up shown below with inexpensive shop lamps will work fine :
On the Mac use it with CamTwist Studio for extra control over the captured images (control Brightness/Contrast/White Balance , and also Zoom-in/Zoom-out of the camera) .  On Windows use the software that comes with the camera for Windows : XSight HD camera viewer software.

** UPDATE : use the XSightHD software for both Windows AND Mac for best quality image captures with Recordex Simplicity Cam.   ** 

The Simplicity Cam 5e unit is confirmed to work for capturing high-res. b & w line art animation drawings into TVPaint Animation  with both Windows and Mac OS.   (given that it is an HD USB camera it should potentially work with any other kind of pencil test software such as Digicel Flipbook  or Toki Line Test.  But check the technical specs first with the Support Dept. from whatever software you are using)

More information here:

  http://www.recordexusa.com/page152.html

http://www.recordexusa.com/simplicitycam.html

The manufacturer Recordex-USA does not sell directly to the public, but they have a list of resellers available on their website:    http://www.recordexusa.com/shop-recordex.html


Handroo Animation Table

This stylish portable animation table is made in France by Handroo.

Download the brochure at this link:    Handroo Brochure

They are working on securing a U.S. distributor.   In the meantime you may order directly from them. (although the shipping is expensive)   Price is approximately $300 USD , plus $180 shipping to the U.S.   Check with them on exact shipping cost , depending on your location.


They offer it in kit form, unpainted , so you can customize it with your own colors .  The kit version is slightly less expensive.


Here's the basic unit:


Here's a custom painted version:


Back view: